There are
many ways to start a standard
geometric chess, here we temporarily introduce 12
beginning moves
to help you get more reference information while playing chess. In all cases
if the side making the
late move knows how to deal with it,
the side making the
previous move can not make advantage
of the score from the
beginning move.
1. Move
Axis piece
to position B5 (Figure 01).
Figure 01
Purpose: In
the next move,
the red side can move the Axis
piece to position C5 or G5 to create a
straight line segment (straight line created by one
Axis piece+
2 Point
Pieces).
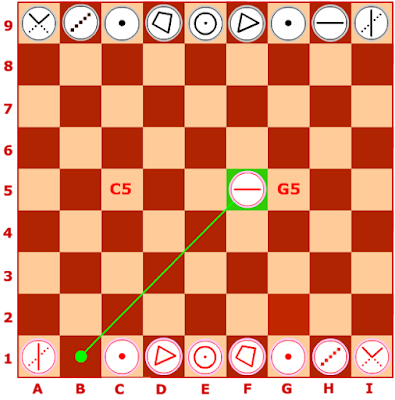
2. Move
Axis piece
to position F5 (Figure 02)
Figure 02
Purpose: In the next
move,
the red side can move the Axis
piece to position C5 or G5 to create a
straight line segment.
3. Move Triangular piece to position
D5 ( Figure 03).
Figure 03
Purpose: In the next
move, the
red side
can
move Triangular piece
to position C5 or G5 to create a triangle (the
triangle created by
one Triangular piece
+ 2 Point
pieces).
4. Move Triangular piece to position
H5 ( Figure 04).
Figure 04
Purpose: In the next
move, the
red side
can
move Triangular piece
to position C5 or G5 to create a triangle.
5. Move
Round piece
to position E7 ( Figure 05).
Figure 05
Purpose: In the next
move, the red side can move 1
Point
piece to position C5 or G5 to create a circle (a circle is made up of 1
Round piece
+ 3 Point
pieces).
6. Move Triangular piece to position
D8 (Figure 06).
Figure 06
Purpose: In the next
move, the
red side
can
move Point piece
from position C1 to
position C7 or C8 to create a triangle.
7. Move Triangular piece to position
D6 (Figure 07).
Figure 07
Purpose: In the next
move, the
red side
can
move Point piece
from position G1 to
position G3 or G6 to create a triangle.
8.
Move
Point
pieces from
G1 to position G3 (Figure 08).
Figure 08
Purpose: In the next
move, the red side
can move Triangular
piece to position D6 to create a triangle or the red side can also move the
Axis piece
to position G6 to make straight lines evenly.
9. Move
Acute piece
to position A2 (Figure 09).
Figure 09
Purpose: In
the next move,
the red side can move
Point piece from G1 to position H2 to
create a triangle (triangle made up of 1
Acute piece
+ 1 Axis piece
+ 1 Point
Piece).
10.
Move
Point
piece from position
G1 to position H2 ( Figure 10).
Figure 10
Purpose: In the next
move,
the red side can move
Acute piece to position
A2
to create a triangle.
11.Move
Cross piece
to position H5 (Figure 11).
Figure 11
Purpose: In the next
move,
the red side can move
Cross piece
to position
F5
to create a triangle
(Triangle is created by one axis piece +2 cross pieces).
12.
Move
Cross piece to position D5 ( Figure
12).
Figure 12
Purpose: In the next
move,
the red side can move
Cross piece to position
F5
to create a triangle.
*****


No comments:
Post a Comment